
Mike
How to create a Hardware Monitor inside your PC Case
Update:
It's been some time since we published our first version of MoBro and it's been evolving ever since.
So there are certain aspects that changed and no longer 100% match to this blog entry.
Please check out our new FAQ for a more up to date guide and explanations:
MoBro on Windows MoBro on the Raspberry Pi
Having your hardware data close to you and available at any time is a nice feature for any gamer or geek. If you have a second screen, you can just start any monitoring app and place it there.
But what if you have a guide for the game open at the same time?
Or just want to simultaneously watch a video?
The space on your second screen is mostly limited.
So we developed our own application to make this possible for our PC mods and builds and today we are releasing our first version to the public!
MoBro - The Modbros Monitoring Bro
Keep in mind that all of this is still in Beta and we are only a few developers working on this in our spare time. So don't expect enterprise grade software.
But we will try our best on constantly improving it.
There are already various ways to approach this problem. For instance by simply placing yet another small screen inside your PC or somewhere beside your main monitor. This is usually achieved by plugging the screens cable directly into your graphics card and then just placing it where you want it to be. Then just normally move the monitoring software there as you would do with any other program. But this approach has some limitations like
-
losing a connector on your graphics card
-
wiring weird display cables through your PC or around your table
-
your mouse can get stuck on the small screen and you just can't find it anymore
We tried to circumvent these limitations by utilizing a Raspberry Pi to display the hardware data that you want to see. For that we developed our own custom monitoring software MoBro, the Modbros Monitoring Service.
In this tutorial we will guide you step by step on how to set up your own Raspberry Pi and connect it to MoBro to display your PC's hardware data.
What you need
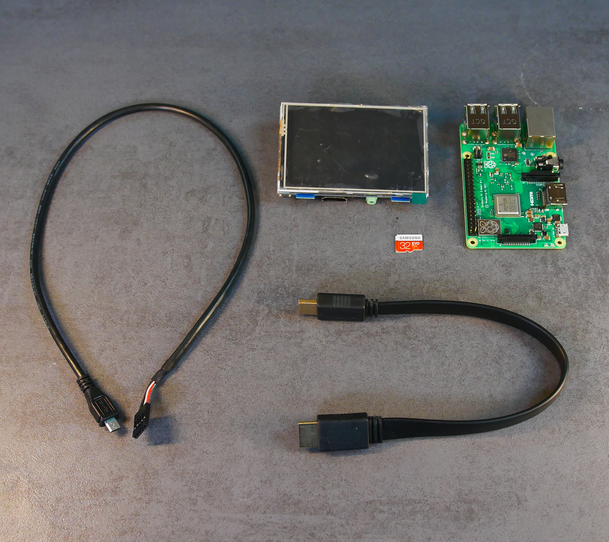
So here is a list of things you would need:
-
Raspberry Pi 4, Raspberry Pi 3 or a Raspberry Zero W (older Raspberry versions won't work, since they don't have wifi)
-
a small display that connects via HDMI to the Raspberry (e.g. 3.5" / 5" or 7")
-
a Raspberry Power Supply or a mirco USB to Motherboard-Header
-
HDMI Cable or Connector
-
depending on your screen you also might to add a USB to microUSB power cable that you can attach directly to the raspberry.
The whole setup should just cost around 40 - 60€ (approx. 55$)..
You also need to download our monitoring software MoBro and our custom Raspbian Image:
STEP 1
Installing the MoBro-App on your PC
After downloading the MoBro App just install it on your Windows machine (Mac and Linux are currently not supported). The only important thing to notice is that you need to accept the admin prompt in order to let the MoBro app get access to your hardware data like cpu temperature and installed graphics card.
After installing the application you can already use it as a standalone monitoring app for your system.
So in case you do not plan on installing the display into your PC (yet) you're actually already done.
If you click on the options-tab, you can give your PC a uniqe Pc Network Name. We added this feature in order to distinguish between multible PC in one local network.
STEP 2
Setting up the Raspberry
In order to display the data on the Raspberry we wrote our own little (well actually it's no longer that small.. but yeah ^^) service for the Raspberry Pi. For easier installation we have already set everything up and exported an image that you can directlly flash on the micro-SD card as is. No further tweaking required. Just download the image and use a tool to flash it on the micro-SD card. We normally use Etcher for flashing our images.
Extraction: Please use either WinRar or 7zip to extract the file.
It's compressed using LZMA2 which is still not supported by default on Windows.
After flashing your image you need to insert your micro-SD card in the Raspberry. Then you are ready to connect your display via HDMI to the Raspberry and power it on. Either connect it via a suitable micro-USB power supply or you get yourself a micro-USB to USB-Motherboard-header cable to directly connect your Raspberry to the motherboard.
If the display does not work out of the box, please check the optional connection section down below.
STEP 3
Connecting the Raspberry to your Network and PC
After you have set up the Raspberry properly you should be seeing the boot screen.
If the Raspberry is not connected to LAN or a WiFi network, which is usually the case, it automatically creates its own hotspot. You can connect to the Hotspot via a mobile phone or a PC to further configure the Raspberry Pi.
The Raspberry should automatically display the WiFi-Network on its display, which you need to connect. Usually the Network name is ModBros_Configuration with the password modbros123.
After connecting to the Rasperry's WiFi hotspot you need to go to your browser and type in the url http://192.168.4.1.
On this page you need to select your local WiFi and enter the password. Don't worry, this information stays on the Raspberry and is never shared with the internet or our application and is just needed for the Raspberry to be able to read the hardware data from the MoBro PC Application. You also need to type in the Pc Network Name as configured in the MoBro desktop application.
If you only have 1 PC connected to your network and did not modify it in the desktop application, the default value should be fine.
After the Raspberry is connected to your WiFi network it automatically searches for the MoBro Application running on your PC.
Note:
If you are using the Pi Zero W instead of the Pi 3, things will take considerably longer. This applies for both booting as well as general navigation. This is due to vastly slower hardware.
So be patient and just give it a minute or two.
Finished!
Thank you very much for reading or maybe even trying out our application.
Please don't forget to let us know what you think about it below or tell us if you have any problems.
Your honest feedback is very much appreciated.
OPTIONAL (display connection via GPIO)
If you want to connect your Display to the Pi via GPIO instead of HDMI, you will need to install the appropriate display drivers for your display. Since every display manufacturer does this differently and we have no real way to check what display you are using we cannot provide an appropriate automatic solution. Also some displays do not work out of the box over HDMI. For these screens you would also need to install the drivers.
In order to install your display drivers on the Raspberry Pi you will need to connect to it by using SSH.
For the SSH credentials just use modbros as the username with password modbros.
(if your’re not familier just open a terminal (or command prompt on windows) and type: “ssh modbros@[YOUR_RASPERRY_IP]”
For your convenience and an easier installation we already loaded some of the most common drivers onto the image.
Simply navigate into the drivers folder by typing “cd Waveshare-Drivers” if you're using a display from waveshare or “cd GoodTFT-Drivers” if you're using a generic display from GoodTFT.
Type “ls” to see all drivers available on the image.
Then just check which display you are currently using (look for the model number on the back or just double check with the manual that came with it) and execute the appropriate script.
Example 1:
Let’s just say you are using the MPI3508 3.5” HDMI LCD display that is connected via HDMI but also placed on the Raspberries GPIO pins. Simply execute the MPI3508-show script by typing “sudo ./MPI3508-show” if you want to use it in Full HD resolution (caution: text will be really tiny) or “sudo ./MPI3508_480_320-show” to use a lower resolution (which we would recommend given the display size).
Example 2:
You are using the 3.5inch Rpi LCD (A) display. This one only connects via GPIO and does not have any HDMI connection. Simply execute the LCD35-show script by typing “sudo ./LCD35-show”.
After successful installation of the display driver, your Raspberry will reboot.
The display should work now :)
Note that rebooting on the Pi Zero takes longer and the display will stay black or completely white for some time until its booted up. Just give it a minute.