Adafruit PiTFT display set up issues for a novice

I am a novice and have never done anything with a Raspberry Pi or Linux before. I bought a Raspberry Pi 3 A+ and an Adafruit PiTFT Plus 2.8” 320x240 display that has no HDMI port and connect via GPIO. Everything worked fine via HDMI to a TV but I had some issues getting the display up and running.
I followed the easy install instructions on Adafruits excellent website https://learn.adafruit.com/adafruit-pitft-28-inch-resistive-touchscreen-display-raspberry-pi/easy-install-2, which can all be done via ssh from a PC. I got as far as specifying the screen (option 1 in the first step of the process for this screen) and the rotation, but it then stopped the install. The issue is that a standard install of Rasbain creates a directory /home/”p”i which your image does not have. The install needs this directory to be in existence for it to work.
The Easy fix (now that I have worked it out) is to create the required “pi” directory before following the instructions on the Adafruit website. I used the following commands via ssh:
cd ~
cd /home
sudo mkdir pi
cd ~
After that I just followed the instruction to mirror the HDMI output (say no to “Would you like the console to appear on the PiTFT display ?”, and yes to “Would you like the HDMI display to mirror to the PiTFT display?”
I love what you guys are doing. I have just had a few frustrating but ultimately rewarding hours on a Sunday afternoon getting this all to work. I love that I learned a little about Linux and now cannot wait to get a window for my little status monitor cut into the custom Parvum case that I am having made for my next PC build.
Just had the same problem, was hoping 1 pre-installed drivers would work, and finally followed adafruot way doing it few reboots later started to work!
Ive got the adafruit 2.8 TFT too - I cant get it working at all - the adafruit script errors right at the end - seems to be wanting to edit the boot/config.txt. Any ideas? I am stumped!
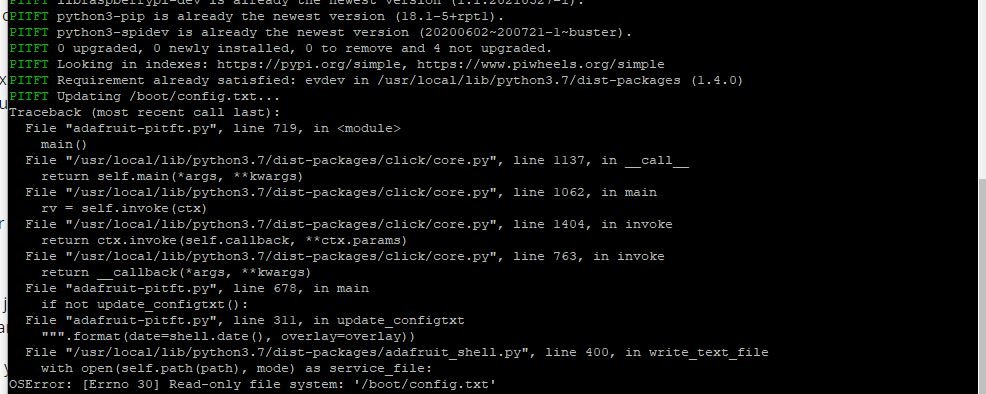
Hi @Lamaman
starting with v12 of the image, we are utilizing OverlayFS for the root partition, while /boot is mounted read-only
You can't modify files on /boot in this mode, as you can see from the last line of your error: “Read only file system: ‘/boot/config.txt’”
Also all other changes made while OverlayFS is enabled will be gone upon the next reboot!
Please have a look at the page here for a more detailed explanation on how to manually install a driver.
I checked the linked page but the commands listed do not work for 12_1.img - I tried using the commands listed but alas they dont work - which is a shame. I tried FSMount and the adafruit drivers seemed to install but all I get now is a black screen as opposed to a white screen.
Not sure if you need to lock us out of the OS because of software issues but frankly its pretty annoying - getting these screens to work at the best of time is a pain in the behind.
Ok, so dont use RC2 as that doesnt have the commands listed in the FAQ. Use 12_1. Thats my first discovery. Secondly, when you enable writes it nerfed my wifi so on reboot I had to use an RJ45 connection to SSH to the Pi. Once that was done I had to re-install the drivers and reboot. Then I discovered that to get the wifi going again I needed to lock down the file system. After that, works great.
Yes, RC2 was not the final version yet, but just one I linked so people can test it and give feedback. 12_1 is the official current version and also the one that's linked on the download page.
I will replace that link, so that confusion won't be possible any more.
Regarding the wifi issues:
The switch to using OverlayFS seems to have caused wifi connection issues for some people. We are aware of that, but I haven't been able to reproduce the issue on my side yet. Tested on Pi 4 + Pi 3 and in different wifi networks and somehow it works fine on my side..
So unfortunately there's no solution to that problem yet.. :/
But as we've heard from a few people already, disabling OverlayFS seems to help in that case. You can do that with a simple click from the ‘Advanced customization' step in the wizard, if you want to.
Regarding your statement about “locking us out of the OS”:
You are not locked out of the OS in any way. On the contrary, you do have full root access!
Also all of the source code of our Raspberry image is openly available here on GitHub. So not intentionally hiding any software issues.
But if you happen to find any, we of course appreciate every contribution ;)
I get that it can be a bit frustrating to tinker around to get a screen working. But we can't possible include the drivers for all those different screen models on the image, as there are simply way too much of them.
And if you feel that OverlayFS complicates things too much for you, you're free to disable it like explained earlier. Or even not using the image at all and setting it up for yourself like described here (e.g. by using the official Raspberry Pi OS)
But after all of that:
Glad to hear that you finally got it to work despite those set backs! :)
Hi - thanks for responding - got there in the end - the wifi piece was a bit of an unexpected pain but the use of RC2 was entirely my fault.