Using RNDIS/Ethernet to connect Raspberry Pi Zero to computer network.

I would like to use the Raspberry Pi Zero to drive the display.
I did not want to have to run another Ethernet cable and/or have a network switch to give it a network not to mention also having a USB dongle.
Is there a way to enable the Ethernet over USB Driver on the mobros image?
IF not what would i need to add to gain this functionality?
If i was able to get the raspberry Pi zero connected to the computer over USB would i have to share my network to it?
Could i just pass the mobros network to the raspberry pi only?
Thank you!
I guess this is not possible.
I will just mod a USB ethernet adapter to make it work. I might even use a USB to USB Networking cable.
Hi @EnDeR WiGGiN
First off sorry for the late response.
I wasn't aware of RNDIS and had to look it up. From what I could gather the protocol looks definitely interesting and promising.
Because internally we also already discussed how we could manage to get the Pi to work with just a single usb connection to the motherboard.
We haven't found a suitable solution yet, so this approach is something we might actually investigate further once we find some time to do so.
Currently this definitley won't work with our custom Raspberry image though.
So you would have to start with the official Raspian image.
If you are willing to tinker a bit and try a few things on your own, you could have a look at the tutorial here:
https://learn.adafruit.com/turning-your-raspberry-pi-zero-into-a-usb-gadget/ethernet-gadget
If you are able to set up a connection, so that the Pi is able to address the PC over that network you should also be able to open MoBro.
Just check out the FAQ here on how to do that:
https://www.mod-bros.com/en/faq/mobro/raspberry/diy-setup
I was thinking the DIY setup would work but using the Raspberry Pi Zero does not give me much performance. I am not sure how well it will performance with the full Raspian image. I can give it a shot once some cables come in.
I hope this would be a good single USB solution. I felt that this would allow your program to stay flexible (web) while also facilitating a cleaner more functional setup.
The Pi Zero is a bit weak in terms of performance, that is correct.
Instead of using the full Raspian image you could try starting out with the Lite version.
Then just manually install X and a lightweight window manager such as Matchbox. This way you won't have to run a full desktop environment which comes pre-installed on the full Raspian.
This is the same approach we took with our custom image.
Okay so i decided to give this project a shot. This is my first raspberry Pi project so bear with me.
TLDR: I was able to get Pi running in Kiosk mode and connected using RNDIS (ethernet gadget). I set static IPs for both the Pi and the computer on the RNDIS interface. I could ping the PI and connect to it but i can not ping the computer from the Pi.
I knew i wanted to do this right so I started with raspberry Pi OS Lite and set it up in kiosk mode. I followed this guide with a minor change. Setup a Raspberry Pi to run a Web Browser in Kiosk Mode
I needed to change this: “chromium-browser --disable-infobars --kiosk 'http://your-url-here'”
To: “chromium-browser --kiosk --app=http://your-url-here
This was to get rid of the banners/bubbles that come up. See: Disable Restore Page/Disable didn't shut down correctly prompt
After this I followed the adafruit guide on setting up the RNDIS/ Ethernet gadget/device (this needs a better name). Turning your Raspberry Pi Zero into a USB Gadget
This is when all the setup work was done and the real work started. I wanted to make it so that the Raspberry Pi could access my localhost and use that page. This proved futile. This is what I was looking at: How can I access my localhost from my Android device?
After this I realised that the Modbros server was serving the webpage on any valid Ip address. I got the idea form this: Connect to localhost on my Pi
I then configured my computer and Pi to have a static ip address on the RNDIS network interface. Followed the same adafruit guide: Advanced Networking (Fixed IP)
Computer IP address:
- address 10.1.1.1
- netmask 255.255.255.0
- gateway 10.1.1.1
Raspberry Pi ip address:
- allow-hotplug usb0
- iface usb0 inet static
- address 10.1.1.2
- netmask 255.255.255.0
- network 10.1.1.0
- broadcast 10.1.1.255
- gateway 10.1.1.1
After this i was able to connect to the Pi from the computer and Ping the Pi from the computer but i was not able to ping the Computer form the Pi. The ping request would just time out. I tried looking at the routing tables but could not find anything that made sense.
When i go to "10.1.1.1:42100?uuid=pi1&name=RaspberryPi" on the local machine. I am able to see the page from modbros.
I was thinking this could be a firewall issue so i disabled the firewall on my windows machine but this did not fix it either. At this point i am not sure why it does not work.
I have two options going forward.
- Go ahead and connect the Pi zero to the local network (LAN) via wifi or shared connection to the windows machine. This solution is a coup out and does not accomplish what i set out to do.
- Make the Pi a DHCP server so that it will assign my computer its own IP address on the RNDIS network interface. I have a good feeling this will work but it will limit the usefulness of the Pi and requires even more setup. This procedure is also found in the Adafruit guide: Run your own DHCP server on the usb0 port
I spent the better part of a whole day on this so i will come back to it later (most of the day was just setup).
Any help or insight into the networking problem would be very much appreciated.
Thank you,
@EnDeR WiGGiN awesome job! I'm going to be digging into this as well soon. I wanted to have my RbP3 mounted in my PC with a 3.5 or 5 inch screen so show the stats from MoBro. The problem is, I wanted it to be dependent on the PC being up and NOT my home network. So the direction you are heading with hosting from localhost (or better yet, a private subnet) is perfect! Thanks for all the hard work and documentation you have contributed so far. Did you already buy a monitor for the pi yet? If so what did you go with?
@Seraksab Is it possible to bind MoBro to a specific IP address instead of it serving to all IP addresses?
@Arvo Bowen III Thank you, I have good news! I got it to work late last night! Also, I do already have a 7 in screen mounted to my PC case. I will do a separate post on that.
As I had thought it was my firewall that was causing the dysfunction. When I tested it before I was a bit haphazard about it and did not do all the steps (it had been like 12 hours).
Once you have set up a static IP on the Pi and the computer you can move on to the firewall. After this, you will see a new network called “unidentified network”. This new unidentified network is considered a Public network. From what I can tell it does not let you configure custom private/public settings Or a “Network Profile” (this is still WIP) for “unidentified network”. If the network reports some kind of name or SSID then you can set a network profile (From what I know now).
You have two options here:
- You can allow the mod-bros app through to public networks. In “Allow an app through firewall” (Quick tutorial for those that do not know).
- Or you can set all unidentified networks to private. This is done by setting Network location from Public to Private.
I chose to go with option 2 but that is not ideal. It is a fine choice seeing has my computer is a desktop that does not go anywhere and won’t be connecting to unidentified networks. (Don’t do this if you have a laptop basically).
There are two maybe 3.5 ways of creating an ideal setup:
- Having the network the raspberry Pi sets up, not be an “unidentified network”. I am unsure how this would be possible. I want to avoid having to put a full DHCP server on the Pi.
- Having the modbro client-side server only point to a single IP. Or maybe a single network interface. Whatever is more feasible.
- Put in the RNDIS driver into the modbros image so that this process will be very simple. @Seraksab
.5: Both of these have the problem of dealing with “Network profile” not being able to be set for the network the Pi makes (when using RNDIS, USB Ethernet of course).
Going forward I will post on superuser to see if someone has a solution for the “unidentified network” problem. If this is not resolved it does not really affect my solution much.
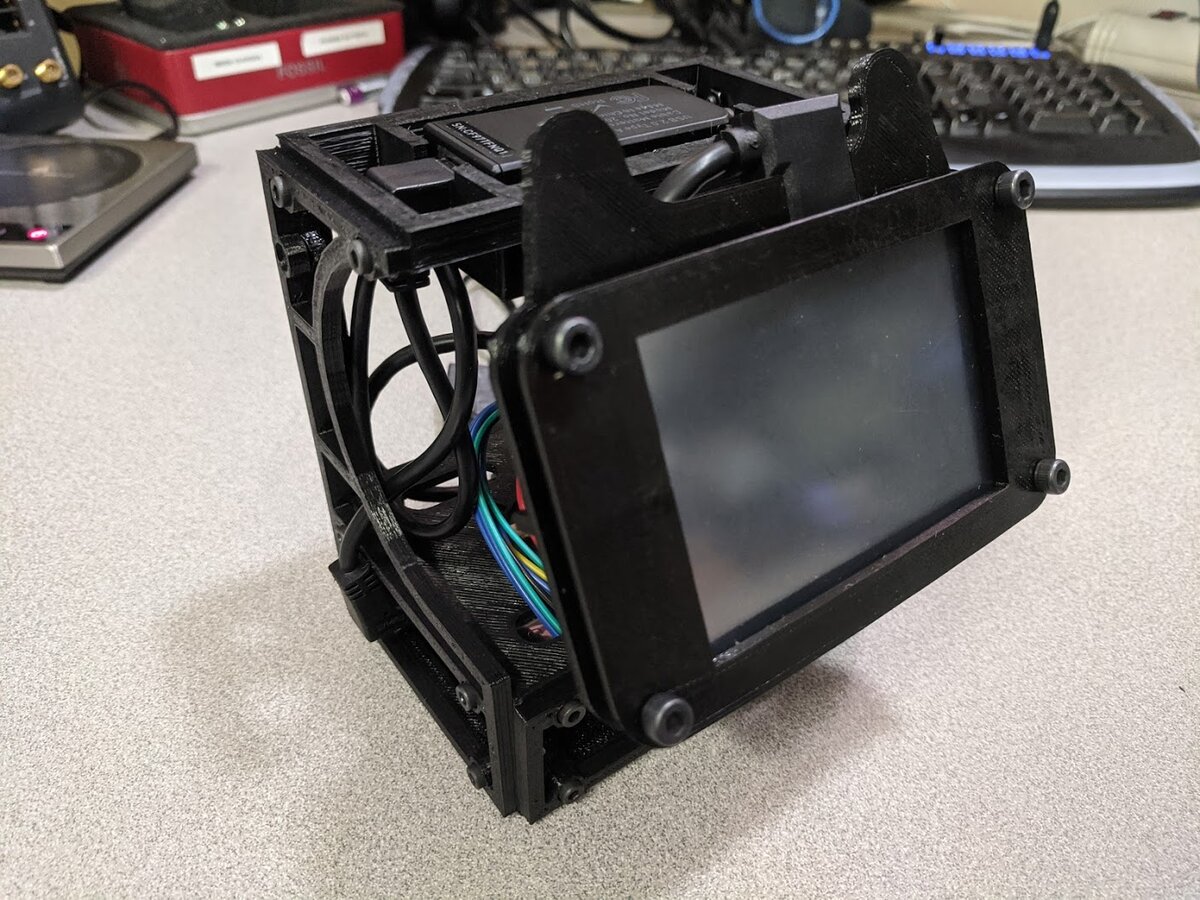
I will be adding my own custom start logo and getting ride of the bootup logs from the PI. I am following this guide: Customizing Boot Up Screen on Raspberry Pi. Depending how it all works I am thinking of adding The PiWatcher to reset it in case it locks up or crashes. I going to put a small fan and heat sink on the raspberry pi zero so that I can overclock it just a bit.
Also for the future, the screen is touch-enabled so if there is some kind of interfacing possible in the future I will add extra USB ports to the Pi Zero. Maybe make it so I can touch the screen to turn the computer on using the GPIO ports. There are many options when you can run your own code on the Pi. Also looking into an even lighter weight version of the web interface. Not sure if there is such a thing (maybe webkit).
TLDR: Setup up your fire wall and network interface properly and it will work!
@EnDeR WiGGiN , first off your name just hit me. Nice! You are still using a Pi Zero right? I'm currently using a rasPi3b+. I'm just trying to get the dang thing to talk to my PC via USB cable. From what I understand the PiZero has a usb port that can be used for data/power and then using RNDIS on Windows you could make the Pi show up as a network adapter. Is that even possible with the Pi 3b+?
So digging into it a little more trying to understand what is needed I found out that using a normal USB cable that had pin-outs on one end will NOT work.
You specifically have to use a USB to TTL Serial Cable. Something like one of these…
https://www.amazon.com/dp/B07R8BQYW1/ref=cm_sw_em_r_mt_dp_U_9B-2Eb30W4BRT
However, my idea is to keep everything internal. So I'm really looking for something that would have pins on both sides (the side that connects to the Raspberry Pi 3 GPIO AND the side that connects to the internal USB headers). I found something smaller like this…
https://www.amazon.com/dp/B00LODGRV8/ref=cm_sw_em_r_mt_dp_U_zR-2EbNXFT4HP
At this point I could use something like the following to connect it to my motherboard…
https://www.amazon.com/dp/B06Y5C7DKH/ref=cm_sw_em_r_mt_dp_U_8G-2Eb6G4MB0V
Is there anything that would be built for exactly what I'm trying to do? A USB to TTL Serial Cable with pin connectors at both ends (not just one)?
So to hop in on the discussion again:
I just had a quick look at the schematics for the various Raspberry Pi models here: https://www.raspberrypi.org/documentation/hardware/raspberrypi/schematics/README.md
If i get those correctly, only the Pi Zero (W) and the Pi 4 have USB ports that can be used for both data and power.
On the other models the traces required for data are not there.
So i guess the approach of connecting the Pi with a single standard micro USB cable to the motherboard and using RNDIS on the Windows side would only really work for the Pi Zero and Zero W.
I wouldn't want to connect the Pi 4 directly to a motherboard header due to its power requirements.
@Arvo Bowen III Why would you need to bind MoBro to a specific IP address?
Thanks for the reply @Seraksab! So first off, I think you can indeed get the Raspberry Pi 3b+ for data and power. You just need two USB cables. One would be a standard (for power) and the other needs to be a USB to TTL cable as shown in my posts above. From all the research I have done (and about to test in the next few days) it seems promising to use the GPIO pin-outs to get the data channel.
As for power, I was thinking of trying to use a power cable off my power supply rather than the motherboard.
And the big question you had about “Why???”. Well, the whole reason I started looking for a product like what you have is so I could have something to monitor my PC stats (usually when the monitor shuts off). When my rig is mining crypto during non gaming hours etc. It's an easy way for me to see from a distance if something happened and the mining software stopped mining. Also, it's great while gaming for stats too. ;)
Trying to use this product the way it was intended (over a WiFi network) will not work for me at all. I have so many devices in my house using the two WiFi APs I have currently installed (business class APs), the WiFi in my house has issues from time to time. A lot of times when the access points reboot devices like the Pi don't always recover so gracefully. So my goal here is to still keep your product working as intended but just make it more dependent on the device it's trying to monitor and not dependent on anything outside my PC case. If I can create a subnet local to only my PC that ModBro and my PC talk on then I will be a happy camper. I have complete confidence that this will be achievable and after I get it all up and running I plan on making a small tutorial and posting it on the forums here to help other customers of yours. Unless of course there is a reason you guys would object to it. ;)
Okay so I sorted out the firewall problem. It was just a misconfiguration of the static IP. You need to set a gateway on the PC (Windows 10) that is not the same IP as the PC. I used the Pi’s IP for this purpose. (Network profile not showing up when connecting to a Link local. E.g. USB Ethernet gadget). There will now be a prompt for whether or not it is a Public or Private network and the network profile is now present.
New Computer IP address:
- address 10.1.1.1
- netmask 255.255.255.0
- gateway 10.1.1.2
Raspberry Pi ip address:
- allow-hotplug usb0
- iface usb0 inet static
- address 10.1.1.2
- netmask 255.255.255.0
- network 10.1.1.0
- broadcast 10.255.255.255
- gateway 10.1.1.2
After I figured this out I went back through the whole process again. These are the gotches.
- When setting up the kiosk mode the test command did not work. Had to skip straight to the automatic boot step.
- “1 :startx -- -nocursor” Did not work
- I would set up kiosk mode and initial bringup on a raspberry pi 3B+. So that you have a keyboard and an ethernet connection to the internet. There are lots of updates that are easy to mess up.
- If the Openbox configuration file (autostart) does not show up the install did not work properly.
- Reinstall openbox
- I just restarted (took a lot of time)
- Also reboot the pi after each install. This is what I did to make sure that it all worked right.
- Good internet connection (ethernet)
- After the kiosk mode is working go ahead and add the USB to ethernet command in config file (Adafruit) using your PC. Then just move the SD card straight to the Raspberry Pi Zero. This will ensure a smooth transition.
- I also disabled wifi and bluetooth at this point but that is up to you. I used these commands : Disable Bluetooth or WiFi on the Raspberry Pi
This procedure should work for the Raspberry Pi Zero W as that is what I tested with. Using Raspberry Pi Zero and Pi 4 should be about the same but i have not tested those. If you want to use Raspberry Pi 3 Model A+ or Model A it should be similar with a different USB config command. Has for Any other Raspberry Pi this method will not work.
Also i have now overclocked the Pi zero and it feels like i am getting about double the FPS. It looks and feels a lot better. I did have to put a heatsink and a small fan to keep it cool. I have not done proper testing but it feels like it was 10 FPS and now it is 20 FPS. The max is 60 FPS.
All that is left now is stuffing it in the computer and making it look nice!
EnDeR WiGGiN,
PS: if you can't tell this is also a place for me to document how i did it ;)
@Arvo Bowen III The issue is not strictly getting data to the Raspberry Pi 3b+. It is doing so with an IP address. That is why the gadget mode that the Pi Zero makes this easy.
Using a Serial cable would be another task altogether. You should make a separate thread if you want to attempt to communicate with the Pi using a serial cable.
What i can help you with is using a USB to USB Networking cable. This should allow you to connect a Raspberry Pi 3b+ with a network interface. Basically it is an ethernet adapter that has USBs on both ends. We can start another thread if we want to work on that. I already bought one in case this solution did not work out. Don't forget you can just connect it to your mining rigs with an ethernet cable. Also you can get a usb to ethernet adapter for the mining rig and just plug the Pi directly into that. (this was another option i was thinking of doing) The reason i settled on the USB gadget mode of the Pi zero was because it was the cleanest / best solution. If you don't want to use a Pi zero or try a Pi 4 then there are other solutions just not single USB. Define your needs and wants, then make the best decision to fit that. Customers is a strong word… I prefer freeloaders. :)
@Seraksab Having the ability to assign the IP address to the server would just make it a little more secure. This would make it so that it would only broadcast on the interface you want not every private network interface. It is just a thought but really does not effect the scope of the project.
@Arvo Bowen III The issue is not strictly getting data to the Raspberry Pi 3b+. It is doing so with an IP address. That is why the gadget mode that the Pi Zero makes this easy.
Using a Serial cable would be another task altogether. You should make a separate thread if you want to attempt to communicate with the Pi using a serial cable.
What i can help you with is using a USB to USB Networking cable. This should allow you to connect a Raspberry Pi 3b+ with a network interface. Basically it is an ethernet adapter that has USBs on both ends. We can start another thread if we want to work on that. I already bought one in case this solution did not work out. Don't forget you can just connect it to your mining rigs with an ethernet cable. Also you can get a usb to ethernet adapter for the mining rig and just plug the Pi directly into that. (this was another option i was thinking of doing) The reason i settled on the USB gadget mode of the Pi zero was because it was the cleanest / best solution. If you don't want to use a Pi zero or try a Pi 4 then there are other solutions just not single USB. Define your needs and wants, then make the best decision to fit that. Customers is a strong word… I prefer freeloaders. :)
Son of a gun! I set out to simply make a way for the Pi 3b+ to get an IP address while being internally mounted in my PC case without any wires coming out of the case. The same intent that ModBros had when making their product in the first place (without the hardwired network). The only reason I wanted to add a hard wired network to the equation is just to make the whole thing independent of anything outside of the PC. For example, if I was to take my gaming rig to a buddy's house it would still work even though I'm not connected to a network etc. There would be an internal self contained network for my ModBro app and Pi to talk to on.
So, I never intended to actually use a serial port. At some point (maybe late night with little sleep), I was given the impression that I could use a USB to TTL adapter to actually get a Pi 3 to show up like a Pi Zero does when using the gadget mode. I guess I mixed some videos together in my mind and before I knew it I was ordering parts I didn't need!
It was my intention to get something very similar to the one I bought (except to create a virtual NIC instead of Serial)…
https://www.amazon.com/dp/B00LODGRV8/ref=cm_sw_em_r_mt_dp_U_Hiv4EbRFW6XZF
I'm looking around for something as small as the one in the link above and checking out that page you posted with some product links. Sorry for all the confusion to @EnDeR WiGGiN and @Seraksab!
Is there a better product that will get me an INTERNAL USB (header) to NIC than what I currently have? Something as small as possible.
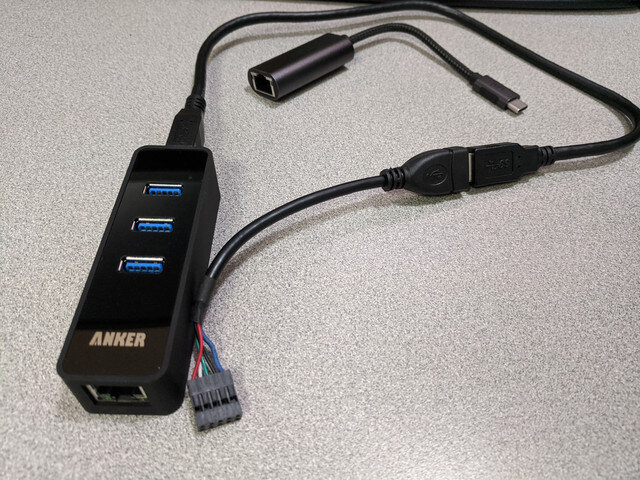
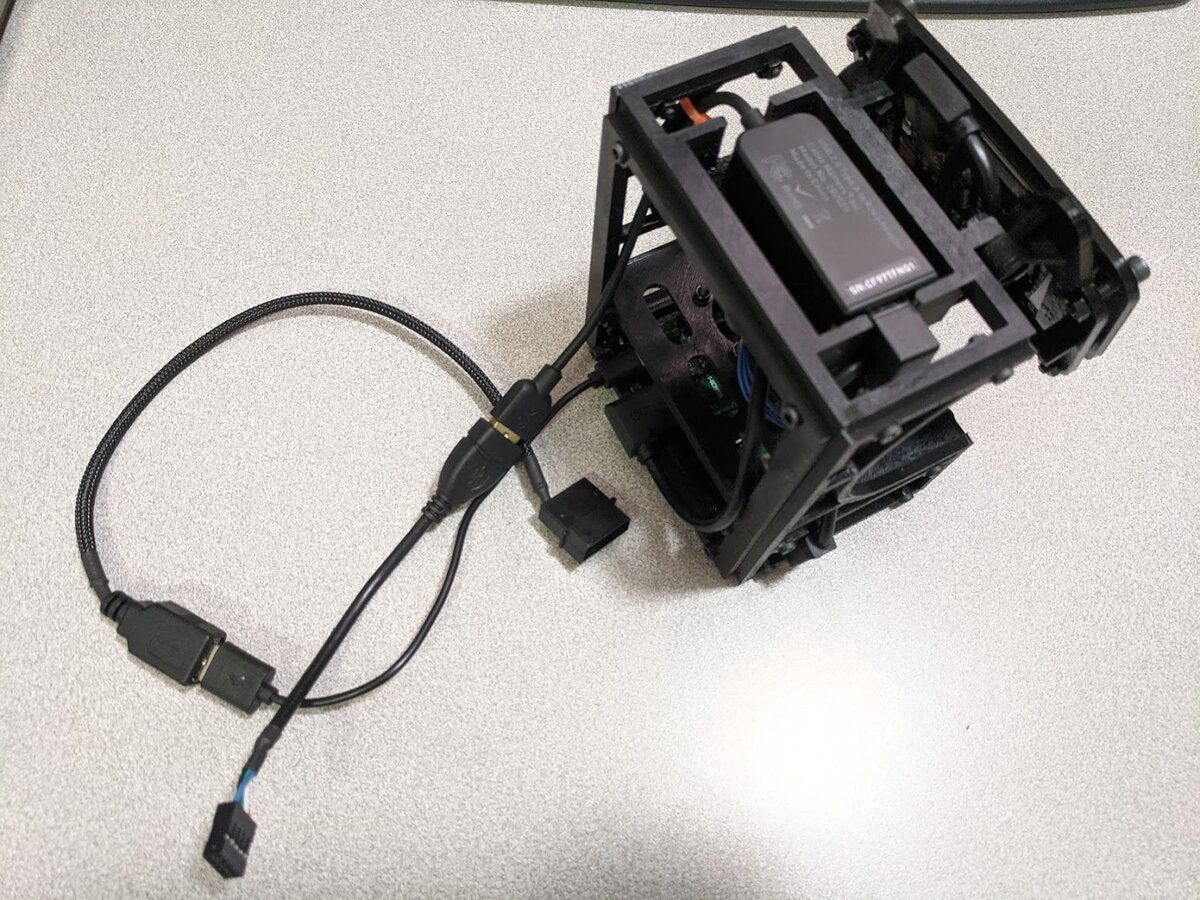
@Arvo Bowen III For just the internal USB i am using something i had lying around. Looks like this. If you want something nice off the shelf they make USB hubs for inside your case. Here and Here. I think asking for a NIC that has an internal USB is asking a lot of an already super niche space.
You can always mode the cable yourself! The one you have is nice because you don't have to permanently damage the cable any USB 3 type B would work. The hard part is if you want to keep USB 3 functionality. If you don't care about USB 3 then it is only 4 wires. Otherwise it is a lot more. Really i would just get something like this if you have the spare header for it. If you want it to look really clean you will have to splice all the wires yourself.
Truth be told if what you have now works i don't see why you should bother changing it. It is already a mining rig.
@Arvo Bowen III Hey i found just the thing for you. This cable plugs right into your USB dock and a USB 3 motherboard header. JSER 90 Degree Left angled USB 3.0 B Type Male to 3.0 Motherboard 19pin Header It may be out of stock. Here are some back up links with much longer ship times. Alibaba search. Also Here are some USB 2.0 if you don't have a 3.0 header. Amazon, Back up Alibaba Search.
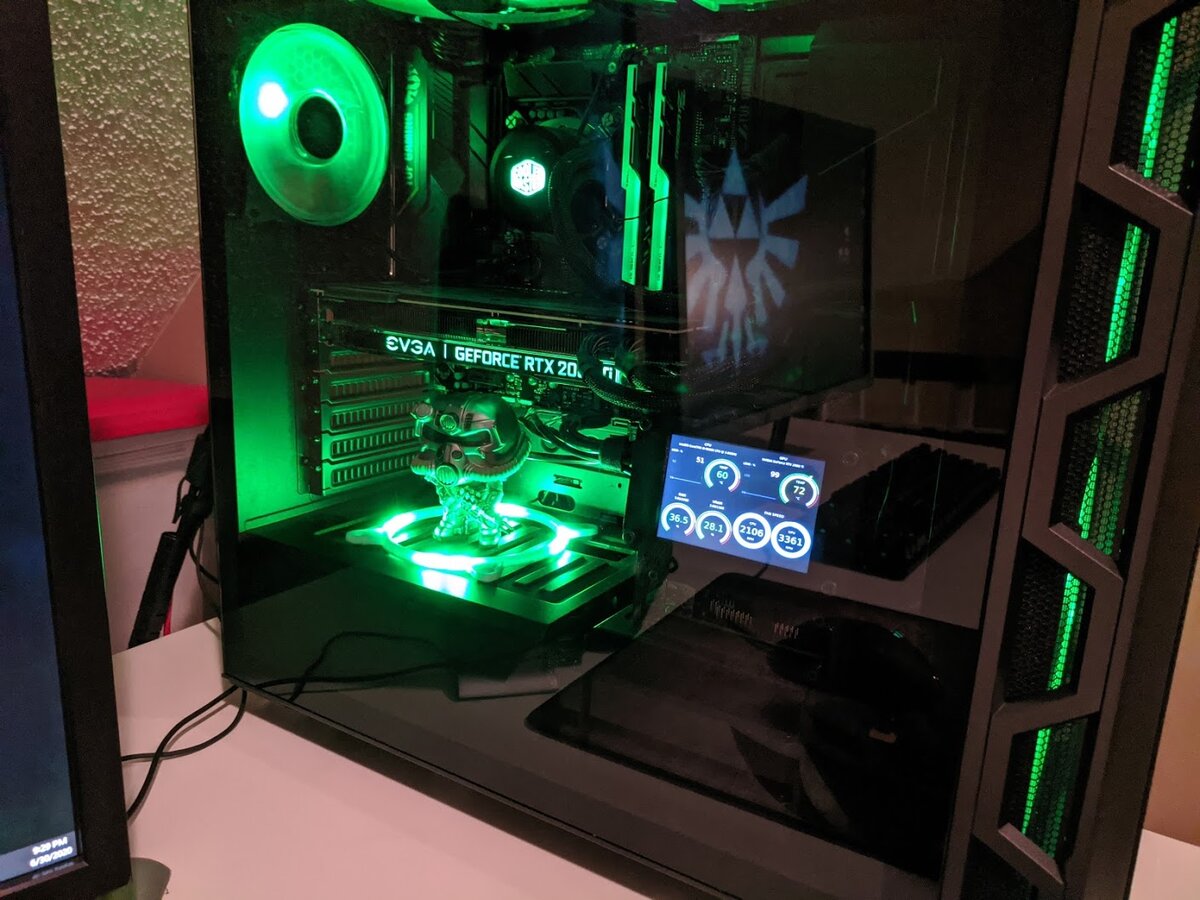
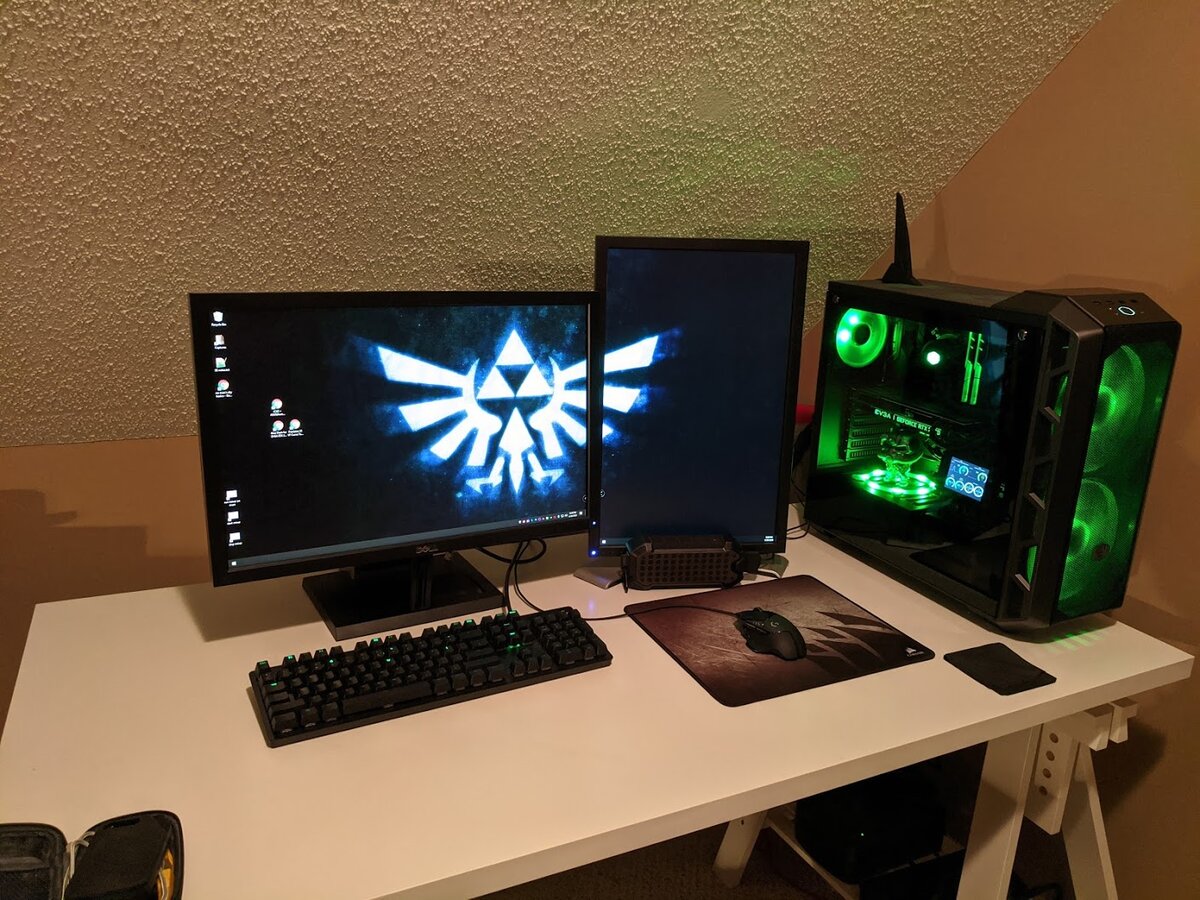
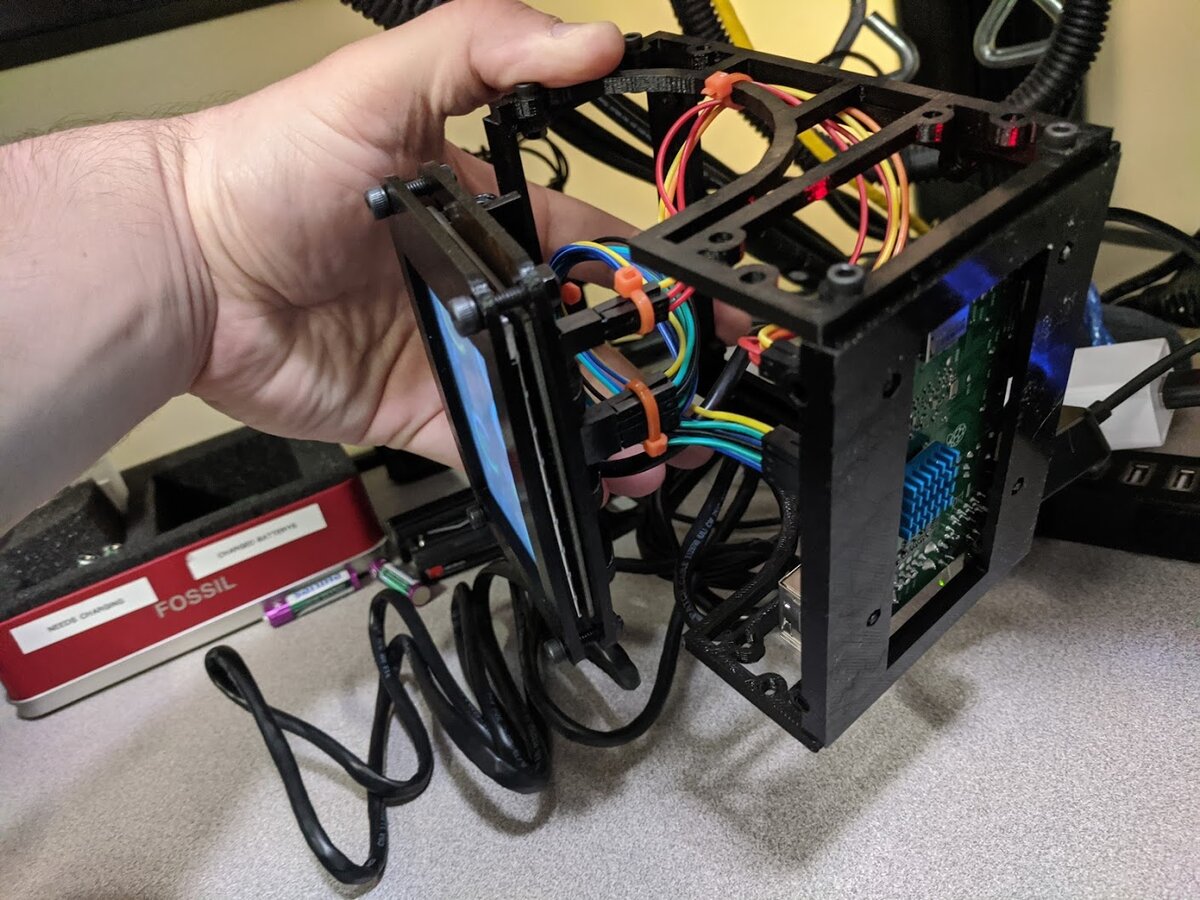
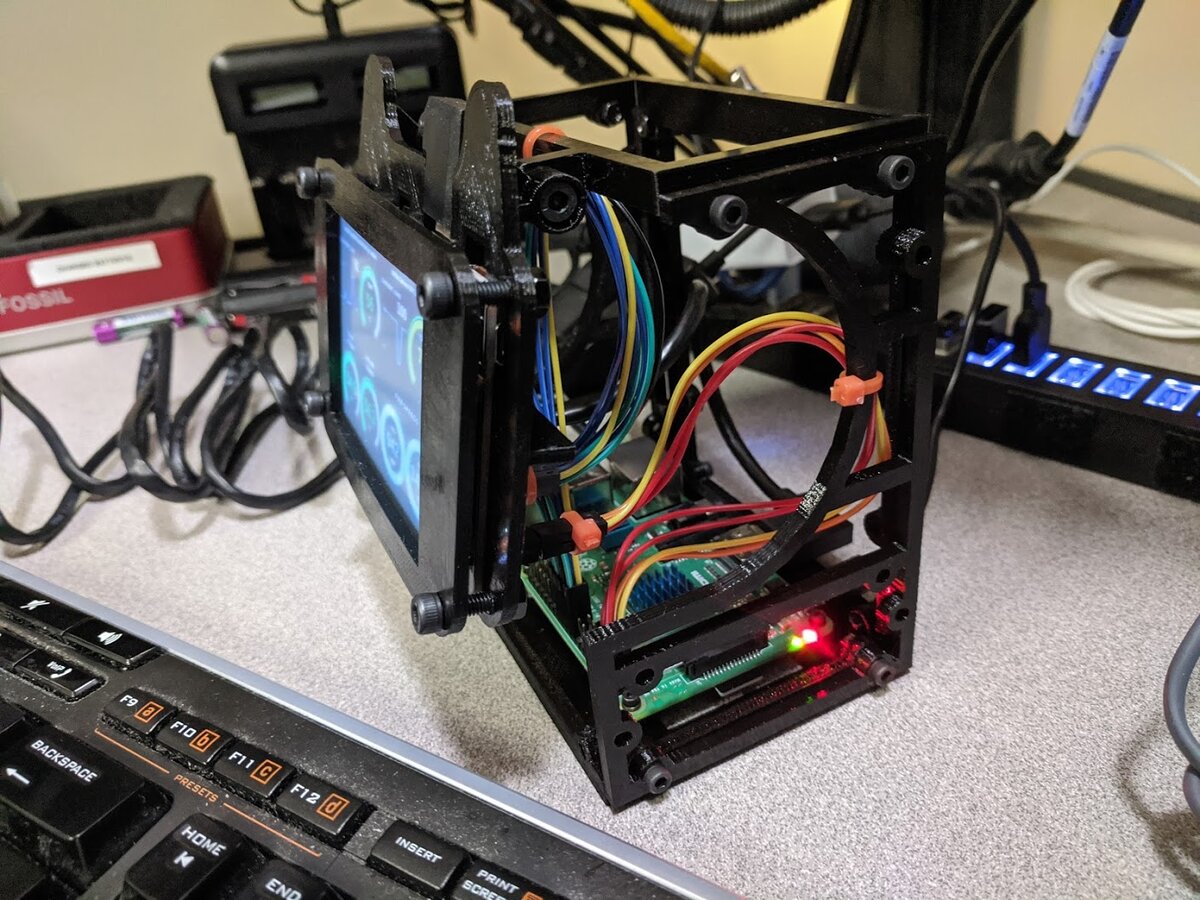
@EnDeR WiGGiN I almost forgot to update you on what I ended up with. I wanted to share what the final product looks like. My goal was to have a display shown in my PC case to monitor the temps and cpu/gpu utilization to be able to determine when mining was happening on my gaming PC. This way, if I walked by when the gaming PC was not being used I could see if the mining app crashed for some reason and I needed to get back on to start it up again.
With this setup, I have two things to plugin on the inside of the PC.
- An internal USB header
- A molex PSU power cable
I can't wait until ModBros makes the interface easy to mod! Right now it seems too cumbersome to allow for a quick change of the skin. Or at least some type of better tutorial then they have currently to help us understand how to do a change (like on the default dubbadhar skin, switching one of the line charts with a circle gauge or making it just show three circle gauges instead etc). Just having two skins that look similar with slight changes in the default skins goes a long way to help others understand what needs to change and how it all works.
But thanks for all the help @EnDeR WiGGiN and @Seraksab! I learned a lot working on this project.
Anywho, this is what I ended up with…

Any updates or possibly a guide on how to do this? I've got everything setup but I'm having a hard time actually displaying the modbro webpage data on the screen..