Setting up your Raspbery Pi as an Ethernet gadget (over USB) allows you to connect the Pi Zero via a single USB cable and utilize it for both data and power.
No wifi or ethernet cable required.
We do not recommend this setup for complete beginners, as it requires adjusting network configurations within Windows.
Note: This is currently only supported on the Raspberry Pi Zero (W). Other models can NOT be used for this!
Requirements
- A Raspberry Pi Zero (W)
- A micro SD card with our custom Raspberry Pi image (at least v12) flashed onto it
- A micro USB cable
- The MoBro Windows application running on your PC
For this to work we will need to configure both the Raspberry Pi itself, as well as some network settings in Windows on the PC the Raspbery Pi is connected to.
1. Setup Raspberry Pi
First make sure the SD card is flashed with at least v12 of our custom image and inserted in the Pi.
Now plug in the micro USB cable from the Pi Zero to the computer.
Make sure the cable is plugged in on the "USB" connector on the Pi Zero, NOT the "PWR" connector.
 After the Pi has booted, connect to the configuration hotspot like you would in the regular setup.
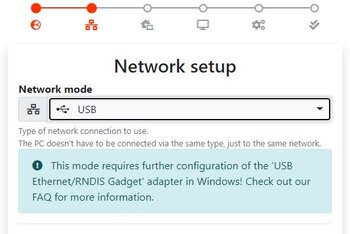
In the 'Network setup' step, select the 'USB' network mode like shown to the right.
Continue the configuration like regular and set up your display driver, screen saver, etc..
After applying the configuration, the Raspberry Pi will reboot twice.
This can take a few minutes on the Raspberry Pi Zero and is completely normal. Just give it some time.
This already concludes the setup on the Raspberry Pi itself.
2. Setup under Windows
Now that we have successfully setup the Raspberry Pi, we need to adjust a few network settings in Windows itself.
After applying the configuration and rebooting the Raspberry Pi Zero, Windows should already pick it up and automatically download and install the RNDIS Ethernet drivers.
The Raspberry Pi should now be listed as new network adapter called 'RNDIS Gadget' (or similar) in the device manager.
 Now Open up Network & Internet in the Windows settings and click on Change Adapter Options.
Find the new RNDIS adapter and right-click and select Properties.
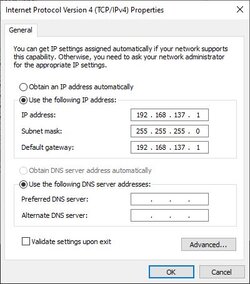
Select the Internet Protocol Version 4 (TCP/IPv4) from the connection list and click Properties.
Enter in 192.168.137.1 as the computer's IP address and gateway.
The subnet mask is 255.255.255.0
Sharing the internet connection
Now we need to share our internet connection with the Raspberry Pi.
Otherwise the Pi won't be able the access the NTP server and will therefore display the wrong time in the clock screensavers.
To do so, go back to Network & Internet > Change Adapter Options.
Right-click your main network adapter (your internet connection) and select Properties.
Switch to the second tab called Sharing.
Now enable the checkbox to Allow other network users to connect through this computer's Internet connection and select the RNDIS network adapter (your Pi Zero)
Hitting OK might show a warning that Windows will change the IP address of the selected adapter to 192.168.137.1
That's fine, since it's the network adapter of our Raspberr Pi Zero and we've configured the IP address to 192.168.137.1 anyway
A last reboot of the Raspberry Pi concludes the setup.
Now your Raspberry Pi should be able to connect to the MoBro app running on the PC and be listed under 'Connected devices' like regularly.
SSH connection
After a successfull setup, you can regularly connect to the Raspberry Pi over SSH if you need to.
The Pi is reachable under the IP address 192.168.137.2 with the default credentials of user 'modbros' and password 'modbros'.